Get Started | Papilio - Papilio DUO - Xilinx WebPack VHDL - LogicStart Shield - Computing Shield
Contents
Overview
Install Papilio Software on Windows
Install Papilio Software on Linux
Load Bit File
Papilio Quick Start Guide
Overview
Welcome to the Papilio Quickstart Guide and the exciting world of FPGA development. This guide covers the basics of installing the software and drivers needed to load the various projects that you create for or download to the Papilio Platform hardware. It also covers loading a basic, “Hello World” bitstream that blinks pins and outputs an ASCII table over the serial port. This guide does not cover the creation of VHDL code, it will get you up to speed with loading a bit file to the Papilio. For a more in depth guide on writing VHDL code for the Papilio download Hamster's free eBook.
Quick Links
- Papilio Loader Windows and Linux Installer
- Papilio One Quick Start Sketch
- Download Papilio One 250K QuickStart bit file
- Download Papilio One 500K QuickStart bit file.
- Download Papilio Pro LX9 QuickStart bit file.
Operating Systems
- Windows XP
- Windows 7
- Windows 8
- Windows Vista
- Ubuntu Linux
Hardware this Guide Applies to
Install Papilio Loader and Drivers in Windows
The Papilio Loader allows Xilinx bit files to loaded to the Papilio by simply double clicking on them. The Windows Installer will install the Papilio drivers, Papilio Loader, and will make all file associations. It is a very straight forward Windows Installer that will take care of everything automatically.
Download the latest version of the Papilio Loader Windows Installer
Important: Windows 8 already includes the best drivers for the Papilio. During installation on Windows 8 cancel the drivers installation step and let Windows 8 automatically install drivers for you. If you try to install the Papilio drivers Windows 8 will not allow you. It is best to use the FTDI drivers included with Windows 8 to avoid this problem.
Install Papilio Loader and Drivers in Linux
There are two options to load bit files under linux. There is a Java GUI, called papilio-loader-gui, and a command line tool, called papilio-prog. This is how to install and run the linux tools.
Download the latest version of the Papilio Loader Linux Installer
- Download the Linux tar file from Gadget Factory download section and extract to your directory of choice.
- Ensure that libftdi-dev and the Java SDK is installed.
- In ubuntu do the following command:
- sudo apt-get install libftdi-dev default-jdk
- In ubuntu do the following command:
- Navigate to the directory containing the downloaded install package.
- Run the installer
- ./linux-installer.sh
- Two executables will now be available on the path:
- papilio-prog - The command line Papilio programmer
- papilio-loader-gui - The Java GUI
Load "Hello World" bit file
Overview
The Papilio One QuickStart sketch is a “Hello World” example that does the following:
- Blinks all of the even numbered pins.
- Configures all of the odd number pins as inputs. When a odd number pin is asserted it will cause the even pin next to it to stop blinking and stay at 3.3V.
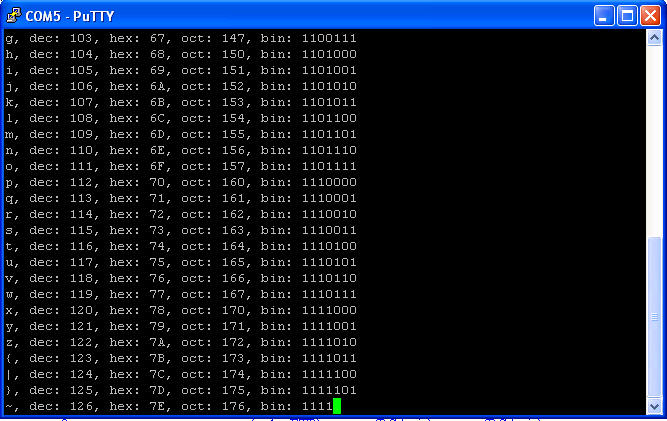
- Sends the ASCII table at 9600 8N1 over the serial port in a continuous loop.
- The B/LED Wing can be plugged into any of the Wing Slots and the LED’s will be blinking. Pressing any of the buttons will cause the LED to stay lit while the button is pressed.
Download
- Download and run the QuickStart bit file for your Papilio board. (Source code for Quickstart Sketch.)
- Double clicking the bit file or allowing the browser to run the bit file should cause the following window to display.
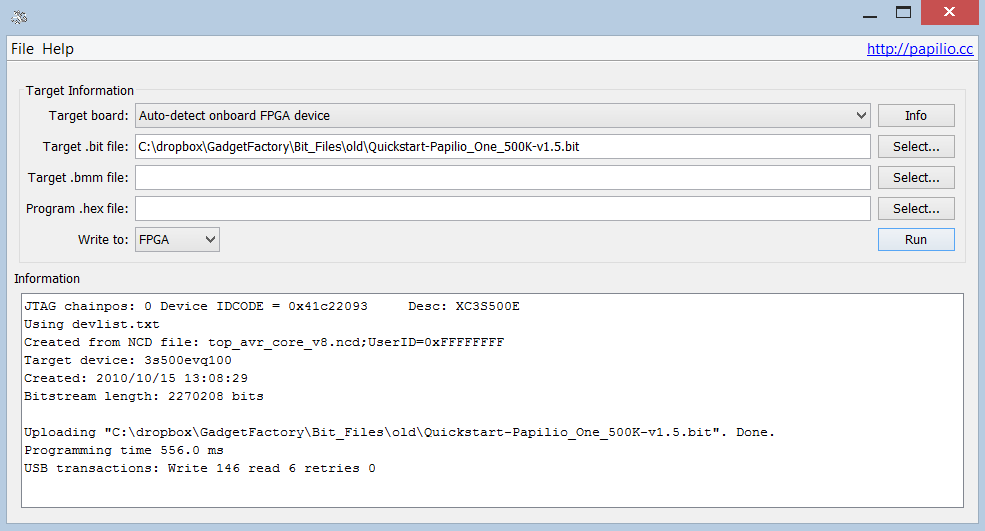
Papilio Loader Help To learn more about what you can do with the Papilio Loader visit the Papilio Loader Help page.
Observe Results
The output of the "Hello World" bit file can be observed by plugging a B/LED Wing in to see the LED’s blinking or by connecting a multimeter to any of the even numbered pins.
Viewing the ASCII table output
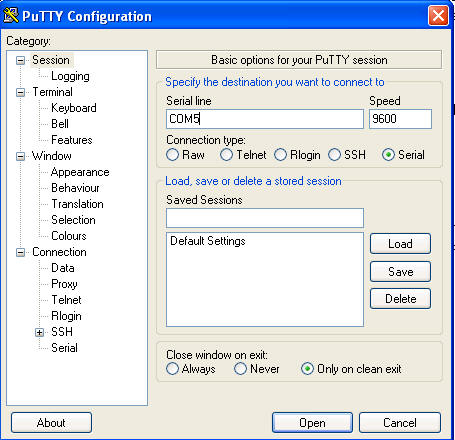
- Open a serial communications program such as Hyperterminal or Putty. This assumes the use of Putty.
- Determine the number of the COM port the Papilio is using.
- Right click on “My Computer” and select “Manage”.
- Click on “Device Manager”
- Expand “Ports”
- Observe the “Papilio Serial Port”
- Run Putty.exe and setup the following settings (substitute your COM port)
- Press “Open” and observe the ASCII Table scrolling by.